 About the RCSAbout the RCS
When you receive your Refrigerated Cooling System (RCS), there will be some installation required, as well as certain guidelines and safety issues to consider.
Select from the following topics for more information:

The Refrigerated Cooling Systems (RCS) are used to perform DSC cooling experiments. There are two different models offered by TA Instruments—the RCS90 and the RCS40. Both models have a cooling head, which is made up of an internal heat exchanger, anti-condensate heaters, and various other components. The cooling head fits over the DSC cell. It is not compatible with the Q20P, Q10P, or the DSC Pressure Cell.
CAUTION: The RCS coolers are not compatible with the accessory outlets on the back of the instrument due to power requirements.
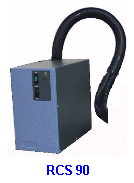 The RCS90
(shown in the figure to the right) consists of a two-stage, cascade, vapor
compression refrigeration system with an attached cooling head. The RCS90
can be used for experiments requiring cooling within an operating range
of -90°C to 550°C. The
maximum rate of cooling depends on the temperature range of your experiment.
The RCS90
(shown in the figure to the right) consists of a two-stage, cascade, vapor
compression refrigeration system with an attached cooling head. The RCS90
can be used for experiments requiring cooling within an operating range
of -90°C to 550°C. The
maximum rate of cooling depends on the temperature range of your experiment.
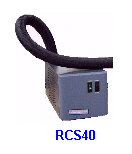
The RCS40 (shown in the figure below) consists of a sing-stage vapor compression refrigeration system with an attached cooling head. The RCS40 can be used for experiments requiring cooling within an operating range of -40°C to 400°C. The maximum rate of cooling depends on the temperature range of your experiment. The RCS40 is compatible with the DSC Q2000, Q200, and Q20 only.
The performance specifications vary based on the RCS model. Click on the link below for the appropriate model:
Temperature Range: –90°C to 550°C
Linear Cooling Rates: Cooling rates available will vary depending on the temperature range. As a general guideline, cooling rates greater than 45°C/minute can be achieved over the range 400 to 100°C and cooling rates of 5°C/minute can be achieved over the range 400 to –70°C.
Ballistic Cooling: Ambient to –90°C 15 to 18 minutes
CAUTION: We recommend that you do not use the RCS when running isothermal experiments above 400°C. Damage to the unit can occur if used at high temperatures for extended periods.
Temperature Range: –40°C to 400°C
Linear Cooling Rates: Cooling rates available will vary depending on the temperature range. As a general guideline, cooling rates from 36°C/min to 10°C/min can be achieved over the range from 100 to 0°C and cooling rates from 10°C/min to 4°C/min can be achieved over the range 0 to –25°C.
Ballistic Cooling: Ambient to –40°C 12 to 15 minutes
CAUTION: We recommend that you do not use the RCS when running isothermal experiments above 400°C. Damage to the unit can occur if used at high temperatures for extended periods.
CAUTION: The operator of this instrument is advised that if the equipment is used in a manner not specified in this manual, the safety protection designed into the equipment may be impaired.
CAUTION: Due to the size and weight of the cooling accessory, the RCS should always be lifted by two people to prevent injury. Do not slide the RCS as this may damage the feet on the unit. Use two people to lift the RCS when moving it to another position.
CAUTION: The cooling head assembly contains coated fiberfrax material. Excessive handling of this material could cause fiberfrax particles to be emitted into the air. See http://www.tainstruments.com for MSDS information.
CAUTION: The RCS contains hazardous materials (i.e., flammable refrigerants). Contact TA Instruments prior to packaging for shipment.
You must unplug the instrument before doing any maintenance or repair work; voltages as high as 120/240 Vac are present in this system.
WARNING: High voltages are present in this instrument. Maintenance and repair of internal parts must be performed only by TA Instruments or other qualified service personnel.
WARNING: Some of the DSC and RCS surfaces get cold during use of the RCS. The cold surfaces can cause condensation and, in some cases, frost to build up. This condensation may drip to the floor. Provisions to keep the floor dry should be made. A slipping hazard may result if the condensation is not cleaned up.
CAUTION: Some surfaces of the RCS and DSC system may get extremely cold during the use of the RCS for cooling experiments. This presents a danger to exposed skin coming in contact with and adhering to the cold surfaces. We recommend that you do not remove the DSC lids when the instrument is at subambient temperatures to prevent moisture buildup in the system. However, if you do remove the lids or handle any cold surfaces, use forceps or gloves to prevent injury.
WARNING: Do not exceed 100°C with the RCS cooling head installed and the RCS power off. Serious damage and/or injury could occur.
CAUTION: We recommend that you do not use the RCS when running isothermal experiments above 400°C. Damage to the unit can occur if used at high temperatures for extended periods.
Each time the RCS cooling head is installed on the DSC the following conditioning procedure should be run before calibration and experiments are performed. The first step of conditioning is used when the system is first installed and periodically thereafter to dry the system to remove moisture in DSC cell and cooling head BEFORE turning on the RCS. The second step is used to stabilize the DSC-RCS system by cycling the system to optimize baseline performance. See also: Setting Up Platinum for Cell/Cooler Conditioning.
Follow the instructions below:
Verify that the DSC cell is empty and cover the cell. If an AutoLid mechanism is present, verify that the lids are seated properly. (Refer to Aligning the AutoLid for instructions to align the lid, if needed.)
Access the Tools/Instrument Preferences/Cooler Page of the DSC instrument control software. Verify that the correct cooler type (RCS40 or RCS90) is selected, check Leave RCS on.
Check Activate secondary purge when lid is opened (RCS and LNCS only), if desired. The RCS Purge will automatically turn on whenever the cell is opened by the AutoLid. (NOTE: This feature is not applicable to DSC instruments that have manual lids.) It is strongly recommended that the cell lids be in place anytime that a sample is not being actively loaded or unloaded.
Select Tools/Instrument Preferences/DSC page of the DSC instrument control software and verify the desired Standby Temperature.
If you have an Autosampler, select Tools/Instrument Preferences/Autosampler page and clear the RCS (Event) Off box (leave box blank) as a sequence stop option. This will allow the RCS event function to operate.
Using the DSC instrument control software, access the Experimental View Summary Page. Select the "Standard" mode, then select the "Cell/Cooler Conditioning" test template from the list. This test is performed with the RCS off.
Click on the Procedure Page.
Set the default conditions of 120 minutes at 75°C and select Apply. These conditions are suitable for typical situations.
Access the Post Test Parameters window and enter a temperature range window of 35 to 50°C to return the cell to slightly above ambient. Once the RCS is operating, it is very important that the cell is always kept slightly above ambient temperature before and after experiments.
Start the experiment.
Upon completion of this experiment, the base and cell purges must remain on continuously. If the purges do not remain on, the atmospheric moisture will contaminate the system and, depending on the time involved and relative humidity, the procedure may have to be repeated. The base purge is automatically active when the RCS is selected as the cooler type.
The following cyclic experiment is performed after the first step in order to allow the DSC-RCS system to stabilize, resulting in optimized baselines and calibration.
Select Control/Event/On from the menu. This will turn the compressor on and begin cooling the cell. Once the RCS second stage compressor has started (a few minutes later), the flange temperature will cool rapidly to its operating temperature.
Verify the instrument preferences and post-test conditions as outlined in steps 2 and 6 in the section "Step 1: Drying the System."
Verify that the cell is emptied and cover the cell.
Observe the Signal Display pane. Verify that "Set Point Temperature" displayed is at the midpoint value of the Temperature Range specified on the Post Test Parameters window. This indicates that the post test temperature control is active. If the post test temperature control is not active (i.e., the "Set Point Temperature" reads 0.00°C), select Go to Standby Temp from the Control menu to invoke the standby temperature set on the Instrument Preferences/DSC Page.
Create and save the following "Custom" method:
1 Data Storage On
2 Equilibrate 50°C
3 Isotherm 60 minutes
4 Mark end of cycle
5 Equilibrate 400°C
6 Mark end of cycle
7 Isotherm 10 minutes
8 Mark end of cycle
9 Equilibrate –90°C (for RCS90) or –40°C (for RCS40)
10 Mark end of cycle
11 Isotherm 10 minutes
12 Mark end of cycle
13 Ramp 20°C/min to 400°C
14 Mark end of cycle
15 Isotherm 10 minutes
16 Repeat segment 8 for 9 times
Start the experiment above as soon as the flange temperature has decreased below 100°C. The flange temperature must be below 100°C when operating an RCS. If the run is started when the flange is above 100°C, then an error message will be posted and the run will be terminated. During normal operation the flange temperature should be less than –25°C at the start of a run.
After conditioning the RCS (by performing both the drying and stabilization steps), evaluate the last baseline run in the method above for any artifacts. Calibrate the DSC before running experiments using the RCS.
![]()
Once the RCS has been properly installed, follow the steps below to set up the instrument parameters and condition the RCS-DSC system for optimum performance.
Select the correct cooler type [e.g., RCS(90) or RCS(40)] on the Tools/Instrument Preferences/Cooler Page of the DSC instrument control software.
Verify that a source of dry nitrogen is connected to both the base purge and Gas 1 ports on the back of the DSC instrument.
Dry the RCS system before turning on the RCS by following Step 1 of the conditioning procedure found in "Conditioning the RCS."
Verify that the RCS control switch on the RCS is set to EVENT and turn the power switch to ON (|). This will turn the compressor on and begin cooling the cell. Once the RCS second stage compressor has started (a few minutes later), the flange temperature will cool rapidly to its operating temperature.
NOTE: The EVENT setting allows the RCS to be controlled by the instrument control software. MANUAL keeps the RCS turned on continuously until it is manually shut off. The EVENT setting allows the software to turn off the RCS in the event of a problem situation, thereby protecting against accidental moisture buildup.
Verify that the post-test conditions (accessed through the Procedure Page by clicking the Post Test button). A temperature window above ambient should be used to prevent the cell from cooling down between experiments (e.g., typical values are 35 to 50°C). Also verify the Standby Temperature value found on the Tools/Instrument Preferences/DSC Page. Once these conditions are verified, select the Go To Standby Temp from the Control menu to invoke the temperature conditions.
NOTE: The DSC cell should be covered when not loading samples and should not be opened below ambient temperatures.
Proceed to Step 2 of the conditioning procedure to further stabilize the DSC-RCS system after installation. This cyclic experiment allows the DSC-RCS system to stabilize resulting in optimized baseline and calibration.
Recalibrate the DSC after conditioning the system.
NOTE: When setting up experiments, be sure to verify the post-test conditions. A temperature window above ambient should be used to prevent the cell from cooling below ambient between experiments.
There is very little maintenance involved with the Refrigerated Cooling System. General cleaning and fuse replacement are the only procedures needed. If there are problems with the RCS that this document does not address, contact TA Instruments for service.
The only cleaning needed is on the outside of the unit. Wipe the surface of the unit with a damp cloth to remove any dust buildup. Make sure that the back of the RCS unit stays free of dust and debris to allow the proper ventilation of the unit. If necessary, vacuum the vents to remove any dirt or debris and allow the fans to operate freely.
Refer to the TA Instruments RCS Getting Started Guide for more information on the RCS.
![]()