 Encapsulating a DSC Sample (Blue or Beige Press)
 Encapsulating a DSC Sample (Blue or Beige Press)
The following topics describe the procedures for sealing samples using the blue or beige DSC sample press. (For information on the Tzero sample press see Encapsulating a DSC Sample with the Tzero Press.) There is a topic for each of the three pan configurations [nonhermetic (crimped), hermetic, and high volume], which can be prepared using the press.
Select from the following topics for more information:


The procedure for preparing nonhermetic sample pans is the same for both the beige and blue sample presses.
Before using the Sample Encapsulating Press, ensure that it is set up for nonhermetic crimping. [See Setting Up the Blue Press for Sealing Nonhermetic (Crimped) Pans or Setting Up the Beige Press for Sealing Nonhermetic (Crimped) Pans]
Practice crimping a few sample pans to become familiar with this procedure before encapsulating your samples. If you have just changed the die (from hermetic to nonhermetic), make a few sample pans to ensure that the die has been installed properly.
If quantitative work will be done, weigh the sample pan and lid and record the value.
NOTE: For most DSC experiments, the parameter of primary interest is sample weight. This can either be obtained by weighing the pan and lid and then weighing the pan and lid again once the sample has been encapsulated, or by taring out the weight of the pan and lid on a microbalance before weighing the encapsulated sample. If T4P heat flow is being collected, however, the former approach is required because the pan/lid weights for sample and reference pans must be known to correct for pan-sensor interactions.
NOTE: When doing quantitative work, use tweezers to handle the sample pan and lid. Touching them with your fingers could leave residue that could affect your results.
Place the sample in the pan. If you are using a powder or granular sample, spread it evenly in the pan.
Place a lid on the pan.
If the sample is small or thin, powder, or granular, align the lid with the pan (see the figure below).
If the sample is large or bulky, invert the lid and place it in the pan.
NOTE: Pans used with inverted lids should not be crimped.
Place the sample pan in the well of the lower crimping die.
Pull the sample press cam lever handle down until the handle hits the stop.
Raise the
lever and remove the pan with tweezers.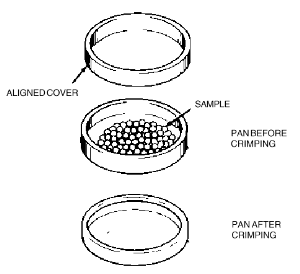
Inspect the pan. The bottom of the pan should be smooth, and the sides should appear rolled down. If there is a ridge on the bottom of the pan, loosen the lower die holder thumbscrew and lower the bottom die holder about ¼-turn by turning it clockwise, and repeat the process from step 6. Adjust the bottom die holder until you obtain a flat pan bottom. Then, lock the bottom die holder in place by tightening the lower die holder thumbscrew. Large or bulky samples may rupture the pan lid. If the lid ruptures, lower the bottom die holder. Slight deformation of the lid is acceptable.
For quantitative work, weigh the crimped sample pan and lid (containing the sample) and determine the sample weight by subtracting the weight of the empty sample pan and lid (step 1).
Prepare an empty nonhermetic pan and lid (follow steps 5 through 9) for use as the reference pan. It is important that the same care be taken in preparing the reference pan as in preparing the sample pan. The pan bottom should be flat.
The procedure for preparing hermetic sample pans is the same for both the beige and blue sample presses.
Before using the sample encapsulating press, ensure that it is set up for hermetic crimping. [See Setting Up the Blue Press for Sealing Hermetic Pans or Setting Up the Beige Press for Sealing Hermetic Pans.]
Practice making a few hermetic sample pans to become familiar with this procedure before encapsulating your samples. If you have just changed the die (from nonhermetic to hermetic), make a few hermetic sample pans to ensure that the die has been installed properly.
For quantitative work, weigh the sample pan and lid and record the value. When doing quantitative work, use tweezers to handle the sample pan and lid. Touching them with your fingers could leave residue that could affect your results.
NOTE: For most DSC experiments, the parameter of primary interest is sample weight. This can either be obtained by weighing the pan and lid and then weighing the pan and lid again once the sample has been encapsulated, or by taring out the weight of the pan and lid on a microbalance before weighing the encapsulated sample. If T4P heat flow is being collected, however, the former approach is required because the pan/lid weights for sample and reference pans must be known to correct for pan-sensor interactions.
Carefully place the sample in the pan. Do not allow the sample to spill onto the lip of the pan. Place the hermetic lid on the pan, and place the pan in the lower die in the sample press. When using solid samples in hermetic pans for quantitative calorimetric measurements, invert the cover to improve sample-to-pan contact and minimize dead volume. This is especially important for purity analyses.
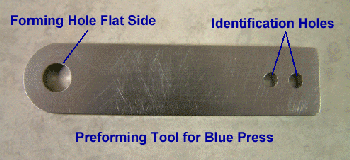 Position the preforming tool by sliding the "forming"
hole onto the extended portion of the upper hermetic die with the "forming"
side down and the flat side up as shown to the right. (The cutout portion
of the tool "forms" the sample pan into shape.) Place the tool
on top of the hermetic die in this position. With your other hand, pull
the sample press cam lever handle down until it stops.
Raise the lever and remove the preforming tool.
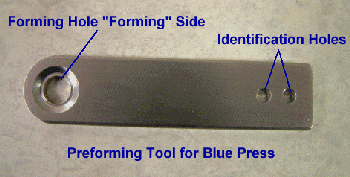 Turn the preforming tool over so that the "forming"
side is now up and the flat side is down as shown in the figure to the
right.
NOTE: The preforming tool for the beige and blue presses are different and should only be used with the appropriate press. "Identification" holes have been added to the blue press preforming tool to help differentiate it from the beige sample press tool.
NOTE: Failure to perform step 7 may result in damage to the upper die.
Lower the lever again with a steady motion until the lever hits the stop. Raise the lever, remove the preforming tool, then remove the pan with tweezers.
Inspect the pan. There should be a smooth, complete seal around the circumference of the pan (as opposed to the rolled down appearance of a nonhermetic pan), indicating a tight seal. In addition, the bottom of the pan should be smooth and flat. To ensure flatness, after removing the sealed pan from the press, place it on a flat surface and gently push down on the lid using the flat side of a pair of tweezers or the preforming tool.
For quantitative work, weigh the pan to determine the sample weight.
Prepare an empty hermetic pan and lid for use as the reference pan.
It is important that the same care be taken in preparing the reference pan as in preparing the sample pan. The pan bottom should be flat.
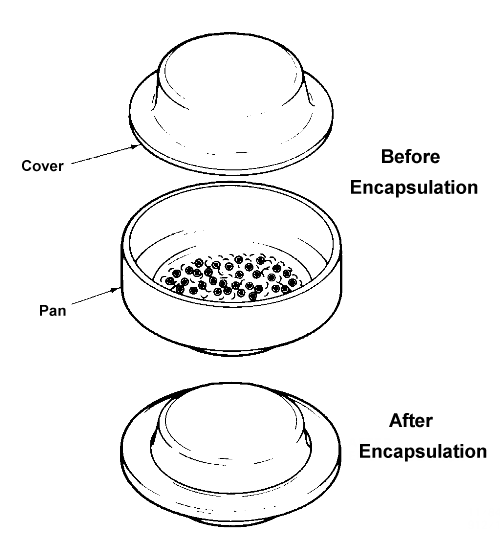
The procedure for preparing high volume sample pans is the same for both the beige and blue sample presses.
Before using the sample encapsulating press, ensure that it is set up for high volume pans. [See Setting Up the Blue Press for Sealing High Volume Pans or Setting Up the Beige Press for Sealing High Volume Pans.]
Practice sealing a few sample pans to become familiar with this procedure before encapsulating your samples.
If quantitative work will be done, weigh the sample pan, lid, and o-ring and record the value.
NOTE: When doing quantitative work, use tweezers to handle the sample pan, lid, and o-ring. Touching them with your fingers could leave residue that could affect your results.
NOTE: For most DSC experiments, the parameter of primary interest is sample weight. This can either be obtained by weighing the pan and lid and then weighing the pan and lid again once the sample has been encapsulated, or by taring out the weight of the pan and lid on a microbalance before weighing the encapsulated sample. If T4P heat flow is being collected, however, the former approach is required because the pan/lid weights for sample and reference pans must be known to correct for pan-sensor interactions.
Place the sample in the pan. Make sure no sample gets on the lip of the pan where the o-ring will rest. (Since high volume pans are primarily used to evaluate liquid samples, a micropipette is an effective way to introduce sample into the pan without contaminating the lip.)
Place the pan on the indentation in the bottom die of the sample press.
Push the o-ring all the way down inside the lid. Place the lid on the pan.
Pull the sample press lever forward until the two die sections meet.
Raise the lever and remove the pan with tweezers.
Inspect the pan. The bottom of the pan should be smooth and the o-ring should not be visible.
For quantitative work, weigh the sealed pan containing the sample and determine the sample weight by subtracting the weight of the empty pan, lid, and o-ring (determined in step 3).
Follow steps 5 through 9 to prepare an empty reference pan. The same care should be taken with the reference pan as you did with the sample pan. (If heat capacity imbalance is undesirable in the final results, an equivalent volume of "inert" solvent can be sealed in the reference pan. For example, when evaluating weak transitions in aqueous biological samples, sealing an equivalent volume of water or buffer in the reference pan will result in flatter baselines and may make interpretation of the results easier.)
For complete instructions on how to prepare samples using the DSC high volume pans, click the following button to open the printable manual.
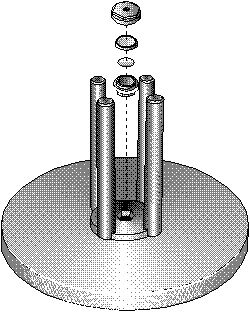 High pressure capsules are sealed using a special Capsule
Sealing Assembly and Sealing tool. The figure to the right shows the assembly.
If you would like to practice sealing a few high pressure capsules before encapsulating your samples, follow the steps below using 35 µL of water as the "sample." If sealed properly, the gold-plated copper seal will rupture at about 1450 psi, which is roughly equivalent to 300°C at sea level. Rupture is readily detected as a large upset in the DSC curve.
If quantitative work will be done, weigh the sample pan, lid, and o-ring and record the value.
NOTE: When doing quantitative work, use tweezers to handle the sample pan, lid, and gold-plated copper seal. Touching them with your fingers could leave residue that could affect your results.
Place the capsule bottom in the hexagonal hole of the sealing plate on the base of the Capsule Sealing assembly.
Place the sample carefully in the capsule bottom. avoid spilling the sample onto the sealing threads.
Place the seal, cupped surface downward, on the capsule bottom.
Place the
capsule lid over the seal. See the figure above for the orientation of
the parts required.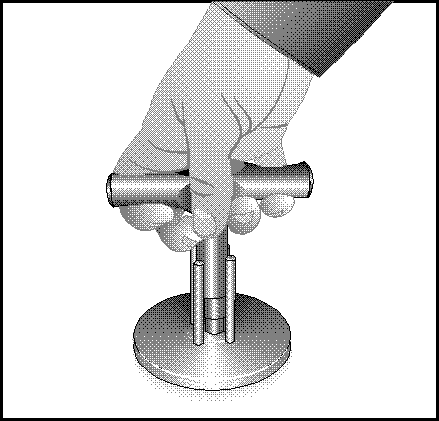
Align the sealing tool over the lid. The four posts on the Capsule Sealing Assembly will help ensure proper alignment. See the figure to the right.
Turn the sealing tool clockwise while applying light pressure, until the sealing tool slips and you hear a "click."
Remove the sealing tool and take out the sealed capsule.
For quantitative work, weigh the sealed capsule containing the sample and determine the sample weight by subtracting the weight of the empty capsule bottom, lid, and seal (determined in step 1).
Wait until the experiment is complete, then reverse the sealing process following steps 6 through 8, but turning the sealing tool counterclockwise. Open the capsule slowly to allow any residual pressure in the capsule to vent gradually. The capsule bottom and lid can be cleaned and reused with a fresh seal.
For complete instructions on how to prepare samples using the DSC high pressure capsules, click the following button to open the printable manual.