 Understanding the Autosampler FunctionsUnderstanding the Autosampler Functions
There are several functions that the Autosampler can perform outside of the usual experiments. These functions help keep the Autosampler in good operating condition and help guarantee reproducible results.
Click on the following topics for more information:

Occasionally you may find it necessary to reset the Autosampler. The reset function clears all commands, instructs the unit to locate the home positions, and returns the Autosampler to the park position. Also instructs the Autosampler to "forget" the current lid and sample pan locations.
NOTE: The DSC AutoLid is automatically opened when the Autosampler Control menu is accessed. If you are using an RCS or LNCS, or just prefer not to open the cell, use the reset function found in the instrument control software.
The Autosampler assumes that the cell is empty when you reset it, so you should check that this is true whenever you reset the unit. If there are any pans in the cell after you reset the Autosampler, you must remove them manually with tweezers.
If you attempt to reset the Autosampler when a pan is still in the cell, use the load function to load a pan into the same position, the Autosampler will not know that the first pan is still there an will attempt to load a second pan onto the first. This could cause damage to the pans. Always check that the cell is empty after the reset function is selected.
Click on the following topics for more information:
To reset the Autosampler, follow one of the following steps:
From the instrument control software select Control/Autosampler/Reset.
From the instrument touch
screen, select the Reset
Autosampler from the Control Command list on the Control
Menu Touch Screen or press the Reset
Autosampler button,  , and Apply.
To reset the Autosampler, follow one of the following steps:
From the instrument control software select Control/Autosampler/Reset.
From the instrument touch screen, touch AUTOSAMPLER on the Control Menu Touch Screen. Then touch RESET on the Autosampler Control touch screen to reset the Autosampler.
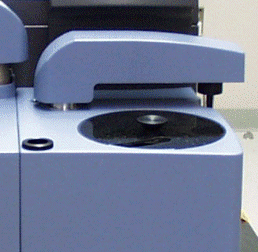 Parking the Autosampler
If you want to move the instrument from one part of the lab to another,
you must first put the Autosampler in the Park position, shown in the
figure to the right. If you are taking the unit in a vehicle and will
be jostling it around, click here ![]() Transporting
the Autosampler.
Transporting
the Autosampler.
Click on the following topics for more information:
To park the Autosampler follow these steps:
Touch the Control button at the bottom of the touch screen. See Introducing the Touch Screen for more information.
Select PARK AUTO from the Control Command list on the Control Menu Touch Screen. Press Apply to initiate the action. The Autosampler arm will place itself in the park position.
To park the Autosampler follow these steps:
Press AUTOSAMPLER on the Control Menu Touch Screen. NOTE: The DSC AutoLid is automatically opened when the Autosampler Control options touch screen is accessed.
Press TEST on the Autosampler Control options touch screen.
Touch the SENSORS key on the Autosampler Test Options touch screen.
Press PARK. The Autosampler will place itself in the park position shown here.
Press EXIT several time to return to the Control options touch screen.
 You may wish to place the Autosampler arm in the home
position to move the arm out of the way as shown in the figure to the
right.
You may wish to place the Autosampler arm in the home
position to move the arm out of the way as shown in the figure to the
right.
Click on the following topics for more information:
To put the instrument in home position from the instrument touch
screen, touch the CONTROL
button then press the Reset
Autosampler button, , and Apply.
To put the instrument in home position follow these steps:
Press AUTOSAMPLER on the Control Menu Touch Screen. NOTE: The DSC AutoLid is automatically opened when the Autosampler Control options touch screen is accessed.
Press TEST on the Autosampler Control options touch screen.
Touch the SENSORS key on the Autosampler Test Options touch screen.
Press HOME. The Autosampler will place itself in the home position shown here.
Press EXIT several time to return to the Control options touch screen.
![]()