 Transporting the DSCTransporting the DSC
Important: If you need to ship this instrument, you will need to contact TA Instruments' Service to properly package the instrument for shipment. Improper packaging will result in damage to the instrument.
If, however, you need to transport the DSC Q series™ instrument yourself by vehicle, follow these instructions to pack up the instrument safely. It is very important to properly protect this precision instrument to guard against potential problems when the unit is unpacked and used again. These instructions are not needed when moving the instrument on a cart within the same building.
WARNING: Have an assistant help you pack this unit. Do not attempt to do this alone.
Follow the instructions that apply to your instrument. Click on the appropriate topic below:

The following instructions provide details for the DSC Q2000/Q200, which is equipped with an AutoLid mechanism.
Remove any sample pans.
Remove the plastic Autosampler tray cover and tray. Place these items in a box for shipping.
Disconnect
and remove any cooling accessories that have been installed. Reverse the
instructions found in these topics to accomplish this: Installing
the Finned Air Cooling System, Installing
the RCS, Installing a Quench
Cooler.
Remove the waste bin from the hole. Place the waste bin in a box to be shipped with the Autosampler. Place the shipping plug (shown in the figure to the right) in the Autosampler waste container hole.
Press the Control
key. Press
 Lid
Open. The
AutoLid will move away from the cell.
Lid
Open. The
AutoLid will move away from the cell.
Remove the screws attaching the cell cover to
the unit cover. Retain
the screws to reinstall the cover. Then
pull the plug on the side of the unit cover out to remove it. 
Lift up the cover to release the tabs and pull the cover towards you as shown in the figure to remove it fully being careful not to damage the cell lids. The cell should be fully exposed.
Obtain the AutoLid Shipping Support. Place the hose clamp loosely around the support, if it is not already present. Place shipping support over cell using care not to damage the nickel rods. Align the cut outs in the bottom of the shipping support with the can legs so that the bottom firmly contacts cell base as seen in the lower right-hand figure.
Tighten the
screw on the hose clamp until the shipping support is secure.
Place the cell cover back over the cell and reinstall it. (See steps 6 and 7.) The top of the shipping support should be seen in the cell opening as shown in the figure to the right.
Follow the steps below to place the Autosampler in the shipping position.
Touch the Calibrate button at the bottom of the touch screen. The figure shown below will be displayed. See Introducing the Touch Screen for more information.
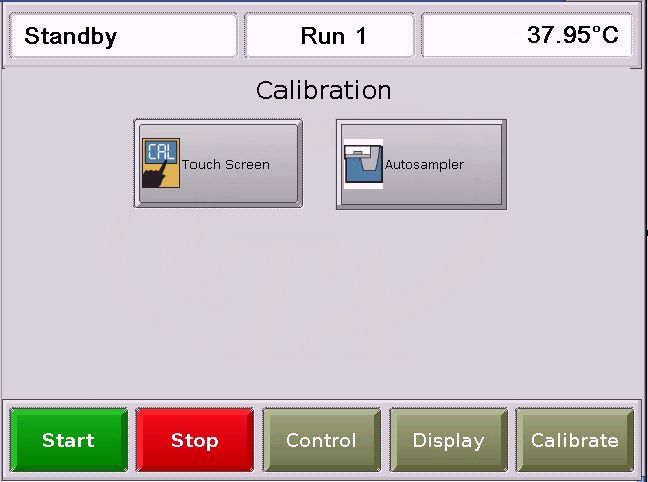
Press the
Autosampler Calibration
button,  .
.
Select the Motor Test tab, the touch screen shown in the figure below is displayed. Press the button to move the desired motor.
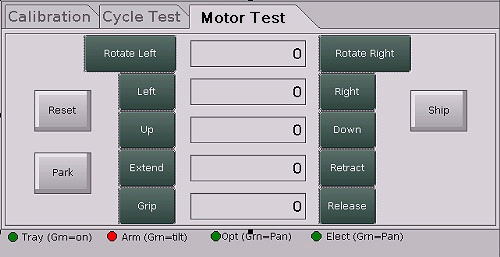
Press the Ship button. The Autosampler will place itself in the shipping position.
Press Control at the bottom of the touch screen.
 Close the AutoLid, then gently slide the split cushion between
the lid and arm as shown in the right-hand figure.
Close the AutoLid, then gently slide the split cushion between
the lid and arm as shown in the right-hand figure.
Obtain the shipping bungee cords. Carefully hook
the end of one bungee cord into the grid of the cell cover. Loop the cord
over the AutoLid arm and hook into the opposite side. 
Take the second bungee cord and carefully hook one end of the bungee cord into the grid of the cell cover. Loop the cord over the Autosampler arm and hook the other end into the opening for the Autosampler tray. The figure to the right shows the bungee cords in place.
Turn off the power. Disconnect the power cable and all other cables and lines attached to the back of the instrument. Place the cables and lines in a box to be shipped with the instrument.
If you have retained the plastic pallet, follow the next steps to mount the instrument. Have an assistant hold one side up while you remove the two mounting feet on one side. Then move to the other side and remove the mounting feet.
Place the pallet on the floor. Using two people, lift the instrument onto the pallet.
Use a 7/16-inch socket wrench to install the hold-down bolts and washers on the bottom of the pallet.
If desired, you can wrap the instrument in a large plastic bag as shown here. The instrument is now ready for transport.

The following instructions provide details for the DSC Q1000, which is equipped with an AutoLid mechanism, that may not be needed with the Q100, without an Autosampler. Perform the steps applicable to your instrument.
Remove any sample pans.
Autosampler Only: Remove the plastic Autosampler tray cover and tray. Place these items in a box for shipping.
Disconnect
and remove any cooling accessories that have been installed. Reverse the
instructions found in these topics to accomplish this: Installing
the Finned Air Cooling System, Installing
the RCS, Installing a Quench
Cooler.
Autosampler Only: Remove the waste bin from the hole. Place the waste bin in a box to be shipped with the Autosampler. Place the shipping plug (shown in the figure to the right) in the Autosampler waste container hole.
Press the CONTROL MENU key on the Control options touch screen. Press LID OPEN. The AutoLid will move away from the cell.
Remove the screws attaching the cell cover to
the unit cover. Retain
the screws to reinstall the cover. Then
pull the plug on the side of the unit cover out to remove it.
Lift up the cover to release the tabs and pull the cover towards you as shown in the figure to remove it fully being careful not to damage the cell lids. The cell should be fully exposed.
Obtain the AutoLid Shipping Support. Place the hose clamp loosely around the support, if it is not already present. Place shipping support over cell using care not to damage the nickel rods. Align the cut outs in the bottom of the shipping support with the can legs so that the bottom firmly contacts cell base as seen in the lower right-hand figure.
Tighten the
screw on the hose clamp until the shipping support is secure.
Place the cell cover back over the cell and reinstall it. (See steps 6 and 7.) The top of the shipping support should be seen in the cell opening as shown in the figure to the right.
Autosampler Only: Press AUTOSAMPLER on the Control Menu Touch Screen. NOTE: The DSC AutoLid is automatically opened when the Autosampler Control options touch screen is accessed. Follow the steps below to place the Autosampler in the shipping position.
Press TEST on the Autosampler Control options touch screen.
Touch the SENSORS key on the Autosampler
Test Options touch screen.
Press SHIP. The Autosampler will place itself in the shipping position.
Press EXIT until the touch screen returns to the Control options.
Close the AutoLid, then gently slide the split cushion between the lid and arm as shown in the upper right-hand figure.
Obtain the shipping bungee cords. Carefully hook
the end of one bungee cord into the grid of the cell cover. Loop the cord
over the AutoLid arm and hook into the opposite side.
Autosampler Only: Take the second bungee cord and carefully hook one end of the bungee cord into the grid of the cell cover. Loop the cord over the Autosampler arm and hook the other end into the opening for the Autosampler tray. The figure to the right shows the bungee cords in place.
Turn off the power. Disconnect the power cable and all other cables and lines attached to the back of the instrument. Place the cables and lines in a box to be shipped with the instrument.
If you have retained the plastic pallet, follow the next steps to mount the instrument. Have an assistant hold one side up while you remove the two mounting feet on one side. Then move to the other side and remove the mounting feet.
Place the pallet on the floor. Using two people, lift the instrument onto the pallet.
Use a 7/16-inch socket wrench to install the hold-down bolts and washers on the bottom of the pallet.
If desired, you can wrap the instrument in a large plastic bag as shown here. The instrument is now ready for transport.
The following instructions provide details for the DSC Q20/Q10. Perform the steps below to prepare it for transport by vehicle.
Remove any sample pans, cell cover and lids.
Disconnect and remove any cooling accessories that have been installed. Reverse the instructions found in these topics to accomplish this: Installing the Finned Air Cooling System, Installing the RCS, Installing a Quench Cooler.
Remove the screws attaching the cell cover to the unit cover. Retain the screws to reinstall the cover. Then pull the plug on the side of the unit cover out to remove it.
Lift up the cover to release the tabs and pull the cover towards you to remove it fully. The cell should be fully exposed.
Obtain the (AutoLid) Shipping Support. Place the
hose clamp loosely around the support, if it is not already present. Place
shipping support over cell using care not to damage the nickel rods. Align
the cut outs in the bottom of the shipping support with the can legs so
that the bottom firmly contacts cell base as seen in the figure to the
right.
Tighten the screw on the hose clamp until the shipping support is secure.
Place the cell cover back over the cell and reinstall it. The top of the shipping support should be seen in the cell opening.
Turn off the power. Disconnect the power cable and all other cables and lines attached to the back of the instrument. Place the cables and lines in a box to be shipped with the instrument.
If you have retained the plastic pallet, follow the next steps to mount the instrument. Have an assistant hold one side up while you remove the two mounting feet on one side. Then move to the other side and remove the mounting feet.
Place the pallet on the floor. Using two people, lift the instrument onto the pallet.
Use a 7/16-inch socket wrench to install the hold-down bolts and washers on the bottom of the pallet.
If desired, you can wrap the instrument in a large plastic bag. The instrument is now ready for transport.
![]()