 DFA Troubleshooting GuideDFA Troubleshooting Guide
When troubleshooting Data File Access (DFA) errors, the root cause almost always falls into one of the following three categories; improperly configured User-accounts, improper Share Permissions, and/or improper NTFS Security settings. The following steps listed below pertain only to DFA errors generated when saving data files to the local machine.
Select one of the following topics to troubleshoot DFA errors:

Before you begin in-depth troubleshooting, check the following items to make sure your system is operating correctly:
Check the system event logs for anomalies and correct them.
Using the Add/Remove Programs, remove the TA Advantage program and then reboot the computer.
Re-install Windows® Service Pack 6a (for NT) or Service Pack 2 or 3 (for W2k).
Install Internet Explorer 6.01 (included on the Advantage CD).
Run TA_Wiz.exe from the root of the Advantage CD and then select the System clean-up option.
Re-install the Q Series™ Advantage package.
Verify that all Ethernet cabling is properly connected.
If necessary, update instrument software to latest version.
If new instrument software has been installed or a 'Reset Parameters' has been performed, it may be necessary to re-browse the data file destination located on the Summary tab of the instrument control program.
Verify the existence of the "_Tama" (TA Message Agent) account. This is a "group less" account; therefore it doesn't belong to any pre-defined group (Administrators, Power-Users, etc.).
For NT Users, open the User Manager in the Administrative Tools group.
For Windows 2000 and XP Users, right-click on My Computer and select Manage, and expand the Local Users & Groups tree.
The "_Tama" account should be listed as a User on the local machine.(See Figure 1 below.)
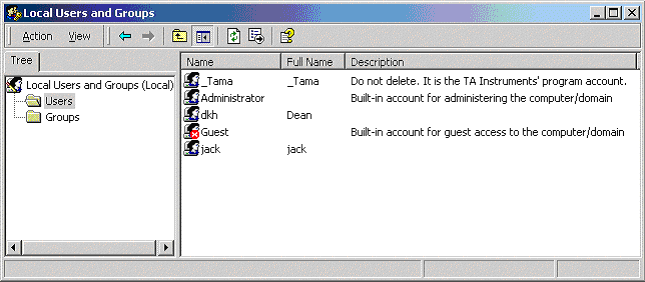
Figure 1
If the account "_Tama" is not listed as a user, this indicates that the Tama service was not properly installed. Failure to create this account is almost always due to a lack of full, un-fettered, administrative level access to the system during installation. An easy way to verify this is to simply try to manually create a test account. If the operation is allowed and successful, you indeed have administrator level rights. If the operation fails, notify your IT personnel and have them provide this level of access for at least the course of installation and troubleshooting.
Once true administrative level access has been provided perform these steps:
Using the Add/Remove Programs function remove the TA Advantage program and then reboot the computer.
Run TA_Wiz.exe from the root of the Advantage CD and then select the System clean-up option.
Re-install the Q Series Advantage package.
Another source of account-related problems can be the lack of sufficient rights on the domain-based workstation. When a user logs into a domain from a Q Series workstation (as opposed to the local machine only), authentication to the local power-users or administrators group is required, however this does not happen automatically.
To determine if this is the source of the problem, log into the workstation as a LOCAL user. At the log-in screen, choose the local machine name in the Log onto field. If the field is not visible, click the Options button. Assuming you now have administrator level local rights, you can also ensure that domain users have local administrator rights by adding them to the Administrators group.
Right-click on My Computer and select Manage, and expand the Local Users & Groups tree.
Highlight the Groups item and double-click on the Administrators item in the right pane. The user(s) allowed to run the Q Series instruments should appear twice in the list; once as the user name only and again with the domain name preceding the user's name.
If the domain name is missing, click the Add button and set the Look in field to be the domain name and scan the list for the user name.
After selecting one or more users (hold down the CTRL key while clicking on the name to select multiple users) click the Add button.
If you wish to add users from the LOCAL machine's user list, change the Look in field to the local machine's name and click the Add button. When you have finished adding users, you should have a dialog that looks something like Figure 2 below (partial list of domain users).

Figure 2
After you close this dialog window, the complete list of members of the Administrators group will now be displayed. (See Figure 3.)
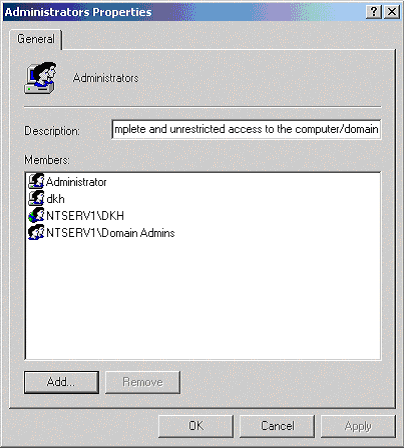
Figure 3
Notice the two listings for the user "dkh." The first listing "dkh" corresponds to the account on the local machine and the second listing "NTSERV1\DKH" corresponds to the account on the domain. The workstation considers these accounts to be two completely separate and unrelated accounts.
While user "NTSERV1\DKH" now has administrator rights to this particular workstation, as far as the domain resources are concerned, his rights have not changed from their original state.
Sometimes DFA errors are caused by the lack of sufficient rights to write to the desired destination folder. The following topic examines the share permissions of the C:\TA folder, but remember these concepts apply to all share permissions.
To check a folders rights:
Right click on the TA folder and select the menu item Properties or Sharing then click on the tab Sharing. In the case of the TA folder, the radio button Share this folder should be selected. If it is not, select it.
Click the Permissions button to view/change the permissions on a user-by-user basis. Figure 4 (shown below) shows the typical share permissions that are applied to the TA folder.
Notice that the "_Tama" account is set to allow "Full Control;" this should always be the case. Also notice that the only other objects listed are not specific users, but instead are entire groups. This is usually a much easier way to control share access instead of specifying particular users. Although not shown here, the local group "Everyone" should also be in the list and be given at least change/read rights.
To add additional groups/users, click the Add button.
Click the drop down arrow for the Look in field to select the desired list and then add the groups/users.
Select the appropriate "Allow" boxes to allow data files to be written.
Click the OK button.
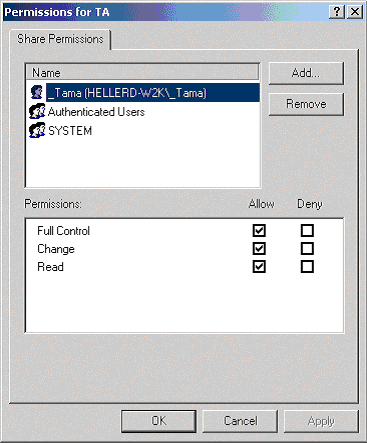
Figure 4
The lack of sufficient rights to the various folders controlled by NTFS (New Technology File System) security settings may also cause DFA errors. This mechanism is very similar to share permissions, but takes precedence so that even if proper share permissions are set up, the lack of NTFS permissions may deny access. To view/change NTFS permissions:
Right click on the folder and select Properties. Unlike shares, NTFS permissions can be set down to the file level.
Click the Security tab. Figure 5 (shown below) shows the typical NTFS permissions that are applied to the TA folder.
Notice that the "_Tama" account is set to allow "Full Control;" this should always be the case. Also notice that the only other objects listed are groups as opposed to users.
If the "_Tama" account isn’t listed, click the Add button.
Click the drop down arrow for the Look in field and select the local machine list and add the group.
Select the appropriate "Allow" boxes to allow data files to be written.
In addition to the "_Tama" account, the accounts "SYSTEM" and "Authenticated Users" should also appear in the list with the appropriate level rights. If they do not appear, add them as directed above.
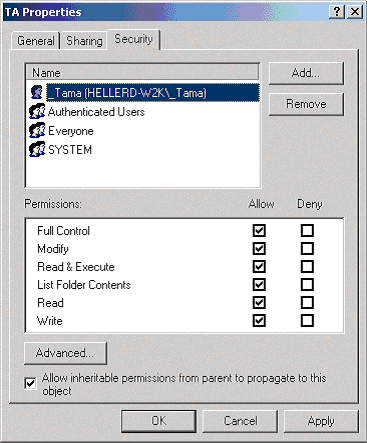
Figure 5
After the desired objects have been added and assigned the appropriate level rights, click the Advanced button.
Check the box labeled Reset permissions on all child objects and enable propagation of inheritable permission.
Click the Apply button to propagate the permissions that were just set to all subordinate files and folders. (See Figure 6 below.)
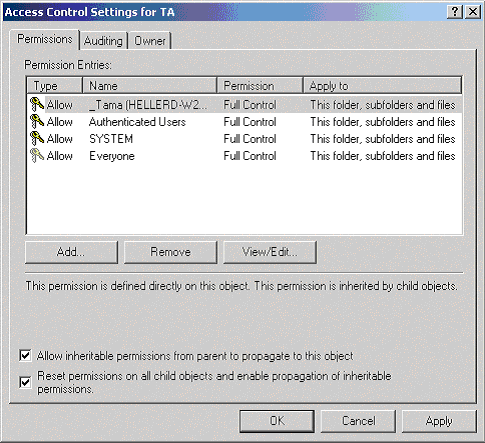
Figure 6