Calibrating the Q2000/Q200/Auto Q20 AutosamplerCalibrating the Q2000/Q200/Auto Q20 Autosampler
The DSC Q2000, Q200, and Auto Q20 instruments all have an Autosampler that may require recalibration to refine pan placement and pickup capabilities.
Select from the following topics for more information:
Automatically Calibrating the Q2000/Q200/Auto Q20 Autosampler
Calibrating the Q2000/Q200/Auto Q20 Tray Positions Automatically
Calibrating the Q2000/Q200/Auto Q20 Cell Positions Automatically
Manually Calibrating the Q2000/Q200/Auto Q20 Tray Pan Positions
Manually Calibrating the Q2000/Q200/Auto Q20 Cell Sample or Cell Reference Positions
Calibrating Q2000/Q200/Auto Q20 Gripper Open or Gripper Closed Functions

This procedure automatically steps through the steps needed for calibration of the Autosampler tray and cell positions. This is accomplished utilizing a beam of light generated by a fiber-optic amplifier located in the sample arm. The light beam is projected downward from the lens in the center of the gripper and the reflected signal is transmitted back through the same lens and to the fiber-optic amplifier. The entire procedure takes approximately three minutes.
Remove the clear plastic dust cover from the Autosampler tray, if installed.
Grasp the center of the sample tray and pull it straight up. Remove the tray exposing the platen underneath.
 Remove any pans left in the cell. Place the cell calibration
fixture in position over the sample and reference positions.
Remove any pans left in the cell. Place the cell calibration
fixture in position over the sample and reference positions.
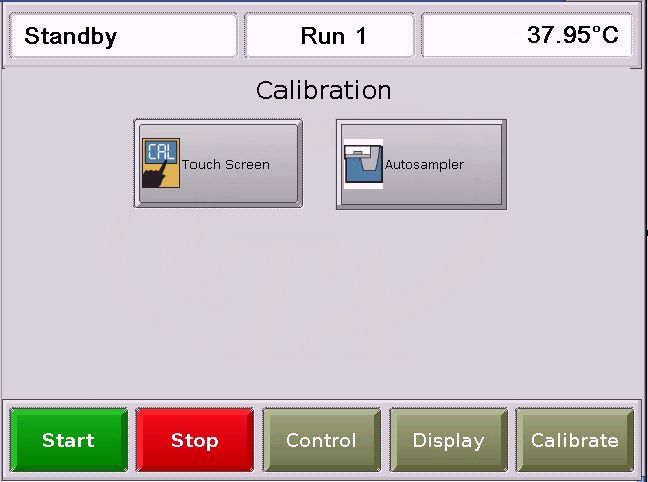
Access the Autosampler calibration functions via the touch screen or the instrument control menu. Click on the following link to display the appropriate steps:
Autosampler calibration via touch screen
Touch the Calibrate button at the bottom of the touch screen. The figure shown below will be displayed. See Introducing the Touch Screen for more information.
Press the
Autosampler Calibration
button,  .
.
Touch the Calibration tab, if it is not already selected.

NOTE: For
an explanation of the red and green sensor indicator lights at the bottom
of the screen, click here ![]() Sensor
Indicator Lights
Sensor
Indicator Lights
Autosampler calibration via instrument control
Select Calibrate/Autosampler from the instrument control menu. The following window is displayed.

Click the plus (+) sign to display the types of Calibration available.
NOTE: For
an explanation of the red and green sensor indicator lights at the bottom
of the screen, click here ![]() Sensor Indicator Lights
Sensor Indicator Lights
Select Full auto cal from the list. Then select the Start button. The calibration will proceed automatically. Do not interrupt the procedure. Once this calibration is complete, the Autosampler arm will return to the park position and a calibration complete message will appear.
Remove the cell calibration fixture and replace the sample tray.
If more refined calibration is needed after performing this calibration, select the desired manual calibration from the list. See Manually Calibrating the Q2000/Q200/Auto Q20 Autosampler for more information.
NOTE: You cannot start experiments when any Autosampler calibration touch screens are displayed.
This procedure automatically calibrates the sample tray positions. This is accomplished utilizing a beam of light generated by a fiber-optic amplifier located in the sample arm. The light beam is projected downward from the lens in the center of the gripper and the reflected signal is transmitted back through the same lens and to the fiber-optic amplifier. The entire procedure takes approximately two minutes.
Before you begin the calibration procedure, make sure the tray calibration start position is correct. See Setting the Tray Calibration Start Position for details.
Follow these instructions to calibrate the circular Autosampler tray so that the arm can accurately pick up the sample pans:
Remove the clear plastic dust cover from the Autosampler tray, if installed.
Grasp the center of the sample tray and pull it straight up. Remove the tray exposing the platen underneath.
Access the Autosampler calibration functions via the touch screen or the instrument control menu. Click on the following link to display the appropriate steps:
Autosampler calibration via touch screen
Touch the Calibrate button at the bottom of the touch screen. The figure shown below will be displayed. See Introducing the Touch Screen for more information.
Press the
Autosampler Calibration
button, .
Touch the Calibration tab, if it is not already selected.
NOTE: For
an explanation of the red and green sensor indicator lights at the bottom
of the screen, click here ![]() Sensor
Indicator Lights
Sensor
Indicator Lights
Autosampler calibration via instrument control
Select Calibrate/Autosampler from the instrument control menu. The following window is displayed.
Click the plus (+) sign to display the types of Calibration available.
NOTE: For
an explanation of the red and green sensor indicator lights at the bottom
of the screen, click here ![]() Sensor Indicator Lights
Sensor Indicator Lights
Select Tray auto cal from the list. Then select the Start button. The calibration will proceed automatically. Do not interrupt the procedure. Once this calibration is complete, the Autosampler arm will return to the park position and a calibration complete message will appear.
Press the Save button.
Replace the sample tray.
If more refined calibration is needed after performing this calibration, select the desired manual calibration from the list. See Manually Calibrating the Q2000/Q200/Auto Q20 Autosampler for more information.
NOTE: You cannot start experiments when any Autosampler touch screens are displayed.
This procedure automatically calibrates the cell positions
using a special cell calibration fixture (shown here). This is accomplished
utilizing a beam of light generated by a fiber-optic amplifier located
in the sample arm. The light beam is projected downward from the lens
in the center of the gripper and the reflected signal is transmitted back
through the same lens and to the fiber-optic amplifier. The entire procedure
takes less than two minutes.
Before you begin the calibration procedure, make sure the cell calibration start position is correct. See Setting the Cell Calibration Start Position for details.
Follow these instructions to calibrate the Autosampler cell positions so that the gripper fingers can accurately place and pick up a pan on the sample and reference positions.
Remove any pans left in the cell. Place the calibration fixture in position over the sample and reference positions.
Access the Autosampler calibration functions via the touch screen or the instrument control menu. Click on the following link to display the appropriate steps:
Autosampler calibration via touch screen
Touch the Calibrate button at the bottom of the touch screen. The figure shown below will be displayed. See Introducing the Touch Screen for more information.
Press the
Autosampler Calibration
button, .
Touch the Calibration tab, if it is not already selected.
NOTE: For
an explanation of the red and green sensor indicator lights at the bottom
of the screen, click here ![]() Sensor
Indicator Lights
Sensor
Indicator Lights
Autosampler calibration via instrument control
Select Calibrate/Autosampler from the instrument control menu. The following window is displayed.
Click the plus (+) sign to display the types of Calibration available.
NOTE: For
an explanation of the red and green sensor indicator lights at the bottom
of the screen, click here ![]() Sensor Indicator Lights
Sensor Indicator Lights
Select Cell auto cal from the list. Then select the Start button. The calibration will proceed automatically. Do not interrupt the procedure. Once this calibration is complete, the Autosampler arm will return to the park position and a calibration complete message will appear. The figure to the right shows the calibration fixture being scanned for the cell calibration.
Remove the cell calibration fixture.
Press the Save button.
If more refined calibration is needed after performing this calibration, select the desired manual calibration from the list. See Manually Calibrating the Q2000/Q200/Auto Q20 Autosampler for more information.
NOTE: You cannot start experiments when any Autosampler touch screens are displayed.
The DSC Autosampler can be calibrated manually using the function available through the touch screen and the directional buttons displayed. Not all of the directional buttons will be applicable and therefore, not available, depending upon the option selected.
Follow the directions needed to perform the following calibrations. Click to jump to the step-by-step instructions for:
Manually Calibrating the Q2000/Q200/Auto Q20 Tray Pan Positions
Manually Calibrating the Q2000/Q200/Auto Q20 Cell Sample or Cell Reference Positions
The tray height calibration adjusts how far the gripper fingers reach down into the tray wells when placing or removing a pan.
Remove the clear plastic dust cover from the Autosampler tray, if needed.
Grasp the center of the sample tray and pull it straight up to remove the tray, exposing the platen underneath.
Access the Autosampler calibration functions via the touch screen or the instrument control menu. Click on the following link to display the appropriate steps:
Autosampler calibration via touch screen
Touch the Calibrate button at the bottom of the touch screen. The figure shown below will be displayed. See Introducing the Touch Screen for more information.
Press the
Autosampler Calibration
button, .
Touch the Calibration tab, if it is not already selected.
NOTE: For
an explanation of the red and green sensor indicator lights at the bottom
of the screen, click here ![]() Sensor
Indicator Lights
Sensor
Indicator Lights
Autosampler calibration via instrument control
Select Calibrate/Autosampler from the instrument control menu. The following window is displayed.
Click the plus (+) sign to display the types of Calibration available.
NOTE: For
an explanation of the red and green sensor indicator lights at the bottom
of the screen, click here ![]() Sensor Indicator Lights
Sensor Indicator Lights
Select Tray height from the list. Then select the Start button. The tray height calibration will begin. Once the calibration is complete a message will appear and the calibration will automatically be stored.
Replace the sample tray.
Press the Save button.
This calibration adjusts how far the gripper fingers reach down into the cell when placing or removing a pan.
Remove the clear plastic dust cover from the Autosampler tray, if needed.
Remove any pans left in the cell.
Place the cell calibration fixture in position over the sample and reference positions.
Access the Autosampler calibration functions via the touch screen or the instrument control menu. Click on the following link to display the appropriate steps:
Autosampler calibration via touch screen
Touch the Calibrate button at the bottom of the touch screen. The figure shown below will be displayed. See Introducing the Touch Screen for more information.
Press the
Autosampler Calibration
button, .
Touch the Calibration tab, if it is not already selected.
NOTE: For
an explanation of the red and green sensor indicator lights at the bottom
of the screen, click here ![]() Sensor
Indicator Lights
Sensor
Indicator Lights
Autosampler calibration via instrument control
Select Calibrate/Autosampler from the instrument control menu. The following window is displayed.
Click the plus (+) sign to display the types of Calibration available.
NOTE: For
an explanation of the red and green sensor indicator lights at the bottom
of the screen, click here ![]() Sensor Indicator Lights
Sensor Indicator Lights
 Select Cell
height from the drop-down list at the top of the screen. Then select
the Start button.
The cell height calibration will begin. The figure on the right shows
the gripper fingers detecting the calibration fixture height. Once the
calibration is complete a message will appear and the calibration will
automatically be stored.
Select Cell
height from the drop-down list at the top of the screen. Then select
the Start button.
The cell height calibration will begin. The figure on the right shows
the gripper fingers detecting the calibration fixture height. Once the
calibration is complete a message will appear and the calibration will
automatically be stored.
Press the Save button.
Remove the cell calibration fixture.
Calibration of Tray Pos 1, 26, and R1 will adjust the position of the gripper in the specified tray position.
Place a sample pan into the desired position.
Access the Autosampler calibration functions via the touch screen or the instrument control menu. Click on the following link to display the appropriate steps:
Autosampler calibration via touch screen
Touch the Calibrate button at the bottom of the touch screen. The figure shown below will be displayed. See Introducing the Touch Screen for more information.
Press the
Autosampler Calibration
button, .
Touch the Calibration tab, if it is not already selected.
NOTE: For
an explanation of the red and green sensor indicator lights at the bottom
of the screen, click here ![]() Sensor
Indicator Lights
Sensor
Indicator Lights
Autosampler calibration via instrument control
Select Calibrate/Autosampler from the instrument control menu. The following window is displayed.
Click the plus (+) sign to display the types of Calibration available.
NOTE: For
an explanation of the red and green sensor indicator lights at the bottom
of the screen, click here ![]() Sensor Indicator Lights
Sensor Indicator Lights
Scroll through the list at the top of the screen until Tray Pos 1, Tray Pos 26 or Tray Pos R1 is displayed. Then select the Start button. The grippers will automatically move to the selected location (but above the tray).
Use the Down/Up and Left/Right buttons to position the grippers so that they are centered above the well.
Press the Grip/Release button, which toggles between grip and release, to direct the gripper to move into well and grip the pan.
Press the Up button to raise the pan up to the top of the well for better visibility.
Press the Left, Right, Extend, or Retract buttons until the pan is satisfactorily centered in the well.
Press the Grip/Release again to release the pan. (The button toggles between grip and release.)
Repeat steps 5 through 10 until you are satisfied with the pan pickup.
Press Save to save the calibration.
NOTE: If a pan is gripped when a new calibration is selected, it will be released, unless you are calibrating a cell position. Then you will be prompted to decide if you want to remove or keep the pan.
These calibrations adjust the position of the gripper at the specified position within the cell.
Place a pan in the cell either by using the Autosampler arm to load one from the tray or simply place a sample pan at the cell location (sample or reference). NOTE: A sapphire calibration disc works well in lieu of a pan for manual cell calibration because it is transparent, which means the platform is visible to you.
Access the Autosampler calibration functions via the touch screen or the instrument control menu. Click on the following link to display the appropriate steps:
Autosampler calibration via touch screen
Touch the Calibrate button at the bottom of the touch screen. The figure shown below will be displayed. See Introducing the Touch Screen for more information.
Press the
Autosampler Calibration
button, .
Touch the Calibration tab, if it is not already selected.
NOTE: For
an explanation of the red and green sensor indicator lights at the bottom
of the screen, click here ![]() Sensor
Indicator Lights
Sensor
Indicator Lights
Autosampler calibration via instrument control
Select Calibrate/Autosampler from the instrument control menu. The following window is displayed.
Click the plus (+) sign to display the types of Calibration available.
NOTE: For
an explanation of the red and green sensor indicator lights at the bottom
of the screen, click here ![]() Sensor Indicator Lights
Sensor Indicator Lights
Select Cell Sample Pos or Cell Ref Pos from the drop-down list at the top of the screen. Then select the Start button. The grippers will automatically move to the selected location.
Use the directional buttons to position the grippers so that they are at the desired location.
Use the Grip/Release button to test the pan positioning.
Press the Left, Right, Extend, or Retract buttons until the pan is satisfactorily centered on the cell platform.
Repeat steps 5 and 6 until you are satisfied with the pan positioning.
Press Save to save the calibration.
NOTE: If a pan is gripped when a new calibration is selected, it will be released, unless you are calibrating a cell position. Then you will be prompted to decide if you want to remove or keep the pan.
This calibration adjusts how far the gripper fingers will open and close. This function is factory-calibrated and should not need to be adjusted. However, if you do adjust these positions, be sure that your do not over grip the pan or open the gripper too wide. This will cause pans to be squeezed by the grippers, if they close too tightly. Or it may cause reference pans to be knocked off the reference platform if the grippers open too widely when entering the cell.
Access the Autosampler calibration functions via the touch screen or the instrument control menu. Click on the following link to display the appropriate steps:
Autosampler calibration via touch screen
Touch the Calibrate button at the bottom of the touch screen. The figure shown below will be displayed. See Introducing the Touch Screen for more information.
Press the
Autosampler Calibration
button, .
Touch the Calibration tab, if it is not already selected.
NOTE: For
an explanation of the red and green sensor indicator lights at the bottom
of the screen, click here ![]() Sensor
Indicator Lights
Sensor
Indicator Lights
Autosampler calibration via instrument control
Select Calibrate/Autosampler from the instrument control menu. The following window is displayed.
Click the plus (+) sign to display the types of Calibration available.
NOTE: For
an explanation of the red and green sensor indicator lights at the bottom
of the screen, click here ![]() Sensor Indicator Lights
Sensor Indicator Lights
Select Grip open at tray or Grip close from the drop-down list at the top of the screen. Then select the Start button.
Press the Grip/Release button to toggle to the desired Grip or Release function.
Press the left arrow next to the Grip/Release button to adjust the gripper's open position or use the right arrow to adjust the gripper's closed position.
Press Save to save the calibration.
In addition to the calibration functions, several other functions are available from the calibration tab.
|
Function |
Description
|
|
Reset auto |
Clears all commands, instructs the unit to locate all home positions, and returns the Autosampler to the park position. Also instructs the Autosampler to "forget" the current lid and sample pan locations (i.e., assumes the cell is empty). |
|
This function is used to set the cell calibration starting position. The starting position will then be used when cell calibration is performed. Follow these steps:
| |
|
This function is used to set the tray calibration starting position. The starting position will then be used when cell calibration is performed. Follow these steps:
| |
|
Park Pos |
Places the Autosampler in the Park position seen below.
|
|
Ship Pos |
Places the Autosampler in the shipping position seen below.
|
|
Waste bin pos |
Select this function to make adjustments to the Autosampler's positioning when delivering a pan to the waste bin. Use the directional arrows to make the adjustments and select Save when completed. |
|
Clear calib offset |
Select this function to clear any calibration offsets already stored. |
|
Restore factory calib |
Select this function to restore the calibration to the settings present when the instrument was shipped from TA Instruments. |
At the bottom of the Autosampler touch screens are four red and green sensor indicator lights. See the following table for an explanation of these sensors.
|
Sensor Lights |
Sensor Description |
|
Home |
Indicates whether or not the Autosampler arm is in the home position for the corresponding function. RED equals home position and GREEN means it is not in the home position. For example: A RED light next to Down/Up indicates that the Autosampler arm is not in the down/up home position. |
|
Tray (Grn=on) |
Indicates whether or not an Autosampler tray is present. RED equals no tray present and GREEN means a tray is present or on. |
|
Arm (Grn=tilt) |
Indicates the arm tilt switch condition. RED means the arm is in the normal position and GREEN means that the arm is tilted up. |
|
Opt (grn=Pan) [Optic Pan] |
Indicates the fiber optic amplifier output condition, which senses the presence of a pan. RED means no pan present and GREEN means a pan is present. |
|
Elect (Grn=Pan) [Electric Pan] |
Indicates the electric pan sensor condition, which senses the presence of a pan. RED means no pan present and GREEN means a pan is present. |
You can test the Autosampler using several other items accessed through the Calibrate touch screen. Click on the links below for more information:
DSC Q2000/Q200/Auto Q20 Autosampler Cycle Test: Allows you to test load/unload functions.
DSC Q2000/Q200/Auto Q20 Autosampler Motor Test: Allows you to test the motion of the Autosampler arm.
![]()